
Contents
In this article I will explain how to create pre-compiled Azure Functions including unit and smoke Tests. I will use Github and AppVeyor to setup continuous integration (CI) and continuous deployment (CD). By adding notifications to our AppVeyor build we are able to leverage the failing build to catch errors in our application and/or deployment pipeline earlier.
Performance benefits of class libraries in Azure Functions
Apart from personal preferences in terms of programming language, frameworks and tooling with Azure Functions one reason to go for C# with Azure Functions is that you can create pre-compiled Function Libraries that will allow your Azure Functions to execute more rapidly. During the first request against a Function App or after it has gone idle (inactive for 5 minutes or more) it will index all functions and compiles C# and F# scripts into an in-memory assembly. While customers are not charged for this cold start, only for function execution, it does initially delay processing, particularly after a scale out or when a node is hit for the first time.
Prerequisites
As of this writing Visual Studio 2017 Preview (15.3) is required. You can install it side-by-side with the regular version and download it here.
- Visual Studio 2017 (15.3+)
- .NET Desktop Development Workload
- Github Extension for Visual Studio
- Azure Function Tools for Visual Studio 2017
- A free Github account (If you have not signed up yet, NOW might be a good time to do so)
- A free AppVeyor account
Creating an Azure Function Project
- Connect your Github account to Visual Studio.
- Create a new Github Repository.
- Create your Azure Functions Project, add Functions and change code as per your needs..
- Add a C# Unit Test Project to your solution and write your tests.
AppVeyor Integration
AppVeyor will build your entire solution and execute all UnitTests it can find. When configured correctly it can be used to automatically deploy your Azure Function App after build and all unit tests have succeeded. By using post deployment scripts we can implement Smoke Tests to ensure the basic functionality of our Functions.
- Setup the Project in AppVeyor
- Create a Function App in Azure.
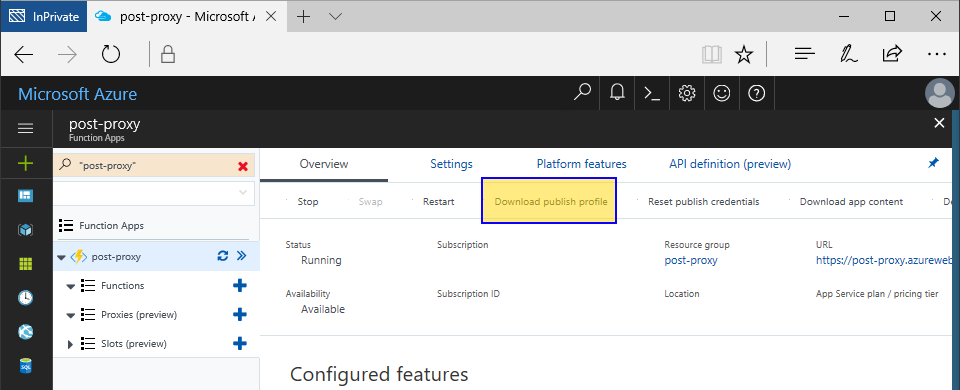
- Download the Publish Profile.

- Create an appveyor.yml file in the root folder of your repository. Here is an explanation on which parameters you need and how they need to be configured.
- image: You need
Visual Studio 2017for Azure Functions Projects - configuration: The
Releasebuild is better for performance - before_build: AppVeyor fails to build the solution unless you run restore nuget packages using the command line.
- -cmd:
nuget restore
- -cmd:
- after_build: To prepare for WebDeployment we have to add all build output to a single zip archive. Substitute your function app project folder name.
- -cmd:
7z a myapp.zip %APPVEYOR_BUILD_FOLDER%\<function-app-folder-name>\bin\Release\net461\*
- -cmd:
- artifacts: Declare the resulting zip file as an artifact for the deployment and provide a name for it.
- path:
myapp.zip - name:
app
- path:
- deploy: This is where we will need the values from the publish profile.
- server:
https://<site-name>.scm.azurewebsites.net:443/msdeploy.axd?site=<site-name> - website:
<site-name> - username:
$<site-name> - artifact: Use the name from the artifacts section above:
app - ntlm:
false - password: Get the Password from the publish profile file and encrypt it using the AppVeyor account settings once logged in.
- secret:
<encrypted password from step above>
- secret:
- server:
- after_deploy: You can declare multiple PowerShell scripts here to perform Smoke Tests using
Invoke-WebRequest. You can use the result to validate the response, throwing exceptions in case of failures, which will result in the AppVeyor Build failing as well. Note the pipe symbol | after ps: this allows the Powershell script to span multiple lines. You can enter as many scripts as you like- ps: |
$baseUrl = "https://post-proxy.azurewebsites.net/api"
$escapedTestPostUrl = [Uri]::EscapeDataString("$baseUrl/TestPost")
$testUrl = "$baseUrl/PostProxy?url=$escapedTestPostUrl&name=Test"
$webRequest = Invoke-WebRequest -Uri "$testUrl"
if(!$webRequest.Content.Equals('"\"Hello Test\""'))
{
throw "Smoke Test Failed"
}
- ps: |
- image: You need
Important: Make sure to leave a blank line at the end of your appveyor.yml file.
Here is a complete sample appveyor.yml:
Conclusion
Using a CI/CD pipeline for Azure Functions is important and this article shows how this can be done for free in open-source projects. Implementing smoke tests that validate the actual API is very valuable and the implementation suggested here, using PowerShell’s Invoke-WebRequest, can also be used in VSTS Projects.
There is still room for improvement here: the current pipeline is not suitable for a QA environment. It still requires a rollback mechanism in case the smoke tests fail.
You can find my sample Project here. This project also demonstrates how we can utilise Azure Functions to trigger webhooks from any device as explained in my other post.
Bonus: Add an AppVeyor badge to your Github Repository 
You can add your AppVeyor Build badge to your Github readme.md so that people can see the current build status. You can use the URL below and enter your Github user name and repository name.
https://ci.appveyor.com/api/projects/status/github/<github-user-name>/<repository-name>?svg=true
e.g.
<img src="https://ci.appveyor.com/api/projects/status/github/aboersch/azure-function-post-proxy-appveyor?svg=true" />
or

You must log in to post a comment.